Pages

Thursday, December 22, 2011

Egyptain One-Eyes

Weird name?  Yes. 
Really yummy?  Yes. 
Fun to eat?  Yes. 

...Three requirements for getting my kids excited about eating.


(You may know these as Sunshine Toast, or Eggs in a Basket, etc.  We call 'em Egyptian One-Eyes.)


First, choose a cookie cutter.  In honor of the fall season we used a pumpkin. 
Cut the center out of the slice of bread. 
(Make sure your cookies cutter itsn't so big that it cuts the crust of the bread.)

Then butter each cut out center, this will be the 'toast.'
 Also, butter around the edges of the bread with the hole in it. 

Heat a skillet or griddle to about 300 or 325 degrees. 
Spray with a non-stick coating, and put the bread on it. 
Crack an egg in each hole, sprinkle with a little salt and pepper. 
Cook for about a minute. 
However long you would normally cook a fried egg, depending on how well you like your yolk cooked.  Then turn them over. 

  The toasts will cook really fast, so don't add those to the griddle until the eggs are almost done. 


These are fine just by themselves, but a slice of bacon goes great with about any breakfast.  :)
And the little peice of toast is perfect for soaking up any yolk that runs out when you cut into the egg. 

Thursday, December 8, 2011

Crepes

Crepes

My sister, Kayla, and I used to make these a lot during high school. 
It was fun coming up with different combinations for the fillings. 

Now, my kids LOVE crepes. 
We like to eat these on Sunday nights. 
(If we have a big lunch, this can double as dinner and dessert!)

Some of our favorite fillings are:
(and almost any combination of these works)
sliced strawberries
sliced bananas
nutella
peanut butter
butter
cinnamon and sugar
powder sugar
Fried apples (my mom gave us some from the Cracker Barrel)
and some homemade creamy crepes sauce

To make the crepes:
Add all the ingredients to a blender and blend till fully combined. 
You may need to scrape down the sides of the blender and blend one more time. 
Just a few seconds is all it takes. 

Heat a small skillet, coat with a non-stick spray.
Pour about 2 Tbs of batter into the pan. 

Roll the pan around until the batter covers the bottom of the pan.


Let it cook for about 20 seconds, it really doesn't take long. 
Then flip the crepe over with a spatula. 
They will be very thin and can tear easily, so use caution. 
Give it about 20 seconds on this side then remove to plate. 

Add your favorite toppings and roll it up. 
Dust with powder sugar. 
Eat while still warm. 


Ingredients
1 1/2 cups flour
2 eggs
2 cups milk
1 Tbs sugar
1/2 tsp vanilla
1/2 tsp salt
1/2 tsp baking powder
1 Tbs butter, melted

Blend all ingredients in a blender. 
Cook on med heat.  About 20 seconds per side, adjust time as needed. 

This makes enough for my family of 6, with a few left over. 
(And my 6 year old eats about 9!!)

Creamy Crepes Sauce

Probably one of the easiest things you will ever make.

(Sorry no picture, but it will be white, like frosting, but not the exact same consistency.)

Equal parts sour cream and cream cheese.  Beat the cream cheese til smooth, add the sour cream.  Beat together.  Sprinkle in a small amount of powder sugar, start with about tsp.  (Depending on how much sour cream and cream cheese you used.)  Beat again.  Done!

Serve on these crepes.

This is not supposed to be real sweet like a frosting.  Add a small amount of the powder sugar, mix, then taste it and see if you want more.  I'm telling ya though, overly sweet and it will be too much when you add your fruit.

Friday, December 2, 2011

Banana Cream Pie


On my gosh, this pie was divine. 

I used to think a good banana cream pie was made with a box of pudding mix and heavy whipped cream instead of cool whip. 
I've learned my lesson...


This pie is made from scratch, including the cream part. 

The cream is made like a custard with tempered egg yolks, and sweetened condensed milk. 
(And a few other ingredients.)

My husband and I have differing opinions on which type of crust a banana cream pie should be made with. 
He likes pie crust, I like graham cracker crust.
Both of us are products of our childhood, in that respect. 

For this crust I used Nilla Wafers. 
And we both loved it!

I found this recipe here. 
Altered it slightly to fit american ingredients. 

Crust
I started by curshing up enough Nilla Wafers to make about 2 cups of crumbs. 
(Very scientific, I know)
Add to that 1/4 cup melted butter and mix with a fork, til fully combined.
Press into bottom of pan. 

For the cream
2 cups milk
1 cup heavy whipping cream
1 can sweetened condensed milk
1 tsp vanilla
1/4 cup corn starch
4 egg yolks
3 bananas

(You will need 2 more bananas and more heavy whipping cream for the top, later.)

Heat the milk, heavy whipping cream, sweetened condensed milk, and vanilla.  Bring to a boil.

While that is heating, whisk the egg yolks and corn starch til smooth. 

Gradually spoon some of the hot mixture into the egg yolk mixture.  Whisk them together, slowing adding a little more.  Once the egg yolks are hot, after you have added roughly 1/2- 1 cup of the milk and cream mixture, whisk the egg yolks into the pot with the remaing cream mixture.  Stir constantly.

Cook until very thick.  Keep stirring!

Once cooked, pour through a sieve to keep any lumps out of the pie. 

Chop 3 bananas and stir into the 'custard.'  Pour over the crust and top with some plastic wrap.  Place the wrap directly on the custard, so no film forms.

Let the pie set in the fridge for at least 3 hours. 

Top with 2 sliced bananas. Sweeten and whip some heavy whipping cream, then pipe around the edges.  Any star tip will work to make the swirl. 
 Grate chocolate on top. 


You should definitely make this, and soon. 

UPDATE:  I made this for Christmas with an oreo crust, and it was fantastic!!  :)


Tuesday, November 29, 2011

Cowboy Caviar

This is a great appetizer, snack, or side dish. 
It's fresh and healthy. 
And it's really good.

Cowboy Caviar


Ingredients

Dressing:
1 Tbs sugar
2 Tbs vinegar (plain white/ distilled)
2 Tbs vegetable oil
Juice from 1 lime (about 1 Tbs)
1/4 tsp cumin
1/4 tsp salt
1/4 tsp pepper

Mix these together and let sit. 

After making dressing, prepare these:
4 avocados- diced
2-3 tomatoes- diced
2 cups frozen corn
1 can black beans- drained and rinsed
1 can black eyed peas- drained and rinsed
2 cloves garlic- minced

Toss allthese  ingredients in a medium/ large bowl.  Drizzle dressing over top, give it a quick stir to fully incorporate. 

Let sit in fridge for a few hours. 
Then serve with tortilla chips.


Here is a quick tip for easy avocado dicing.
Slice avocado in half, remove pit. 
While still in the peel, use knife to cut through avocado, but don't cut through the peel.
Go both directions, cutting into desired size chunks.
Use a spoon to scoop diced avocado out. 

Saturday, November 26, 2011

Carmel Corn

One of my favorite treats is homemade carmel corn. 
 I'm not a BIG fan of popcorn, but if you give it to me like this, I'll never turn it down. 

This carmel corn recipe is super easy. 
You don't need a candy thermometer. 
You don't have to know what 'softball' stage is. 
What you do need is:
a glass (pyrex type) dish/ measuring bowl
popped pop corn
a brown paper grocery bag
and the actual food ingredients...

So, first pop that popcorn. 
 Sift the unpopped kernels out, those aren't so fun to bite into.
Your teeth will thank you. 
Put the popped corn into the brown grocery bag. 

In the glass bowl (should easily hold 4 cups), add the butter, brown sugar, corn syrup, and salt. 
No need to even mix it, yet. 
Pop that in the microwave for 1 minute 45 seconds. 
Stir.  Put back in microwave for 1 1/2 minutes. 
Stir.  Add baking soda and vanilla, stir to combine. 

 It will get a littke foamy and look like this:


Now, pour the carmel over the popcorn, in the bag. 
Jiggle the popcorn around lightly to help coat it with carmel. 
Roll the top of the bag down.  Now shake like crazy.  Turn the bag all around (while holding it shut) to coat all the popcorn. 

Keep the bag rolled, and put the bag in the microwave for about 1 minute and 15 seconds. 
Take the bag out and shake it again. 
Return it to the microwave for 1 minute and 15 seconds again. 
Take it out and shake it again. 
Grease a cookie sheet and pour the contents of the bag onto the sheet. 
Let cool. 


Once cooled, you can break it up and eat it!
It's so good. 


Carmel Corn

Ingredients
1 cup brown sugar
1/2 cup butter (1 cube)
1/4 cup corn syrup
1/4 tsp salt
1/2 tsp baking soda
1 tsp vanilla
1 gallon popcorn (that's popped corn!)


Put sugar, butter, corn syrup, and salt in microwave safe bowl and cook 1 min. 45 seconds in mocrowave.  Stir to combine.  Return to microwave for 1 min. 30 seconds.  Stir.  Add baking soda and vanilla, stir again.  Pour over popcorn.  Jostle the bag while pouring the carmel to help coat all the kernels. 
Roll the top of the bag down (to close it) and shake again.  Place the rolled down bag in the microwave and cook for 1 min. 15 seconds.  Shake the bag again.  Return to the microwave 1 last time for 1 minute 15 seconds.  Shake again, then dump out onto a greased cookie sheet.  Let cool, then break up into indiviual pieces.


Friday, November 18, 2011

Pumpkin Butter

My sister-in-law, Cathy, is so creative. 
She is going to be a contributor on this blog, so expect some great things!!

Here is some pumkin butter that she made and canned and decorated super cute. 

Who wouldn't want to receive one of these as a gift?! 


So, her recipe sounds super simple, and pumpkin butter is SO good.

So, I'm gonna have to try this one out. 
(You should too!)

Pumpkin Butter
Ingredients
29 to 32 oz pumpkin (canned)
1 T. pumpkin pie spice
¾ oz to 1 oz powdered pectin
4 cups sugar
Mix together first 3 ingredients in a 4 qt pot or larger (it splatters), heat on med high until very hot, it will not boil.
Add sugar, stirring constantly, until it comes to a boil. Boil hard for 1 min. remove from heat.
Let sit for 5 minutes. Ladle into sterile containers, put lids on.
Makes 6 to 7 half pint jars.
I put them in a water bath (boil completely submerged in water for 10 minutes) to can them. Allow to cool on a dry towel for 24 hrs. the lids will seal.


Easy, right?! 
Then you can decorate them like she did, if your giving them away as gifts. 

Happy weekend before Thanksgiving!!  ;)

Sunday, November 13, 2011

Cinnamon Nutmeg Syrup

The perfect syrup for the fall and winter months,
but it would taste great any time of year, really.


Cinnamon Nutmeg Syrup


1 cup sugar
2 Tbs flour
1 tsp ground cinnamon
1/2 tsp ground nutmeg
2 cups cold water
2 Tbs butter
1 tsp vanilla

In large sauce pan, combine  first 5 ingredients and whisk to combine.  Bring to a boil over medium heat; cook for 2-3 minutes, stirring occasionally, until the syrup starts to thicken. 
Remove from heat and add the butter (doesn't need to be pre-melted), and the vanilla.  Stir until the butter is melted. 
Spoon over waffles, pancakes, hootenanny, etc. 

Pumpkin Buttermilk Waffles

When I turned 15, I got a waffle maker for my birthday.  I loved waffles, and I still do. 

My 17 month old son also loves waffles.  He will ask for them. 
Boy, was he in heaven yesterday when I made these pumkin buttermilk waffles. 
Actually, all my kids liked them.  Even my daughter who SWORE she wouldn't. 

These are good. 

Just look at them, yummy. 


Pumpkin Buttermilk Waffles

1 cup plus 2 Tbs flour
2 Tbs brown sugar
1 tsp cinnamon
1/2 tsp salt
1/2 tsp baking powder
1/2 tsp baking soda
2 eggs- yolk separated
1 1/4 cup buttermilk
1/2 cup canned pumpkin (not pie filling)
2 Tbs melted butter

Combine all dry ingredients and stir to combine. 
 In separate bowl whip egg whites still stiff peaks form. 
In third bowl, combine pumpkin, buttermilk, egg yollks, and butter.  Beat these wet ingredients together, then add dry ingredients and beat again. 
Fold in egg whites. 

Makes 4 waffles.

Pour or spoon into hot waffle iron and cook til crisp, or desired doneness. 

Maple syrup is good, but we ate these with buttermilk syrup and cinnamon nutmeg syrup and they were fantastic!! 

Homemade French Fries


I like fast food french fries, just like everyone else, right? 

But, who wants to buy those all the time?


These french fries are super yummy, even better than fast food ones, if you ask me, 

Start by slicing up your potatoes.  Do them thin and they wll cook faster.  Or, if you like big, thick, fries, cut them thick and they will just have to cook a little longer. 

After you cut them, rinse them with cold water.  Then pat them dry. 


While you are cutting your fries, let some oil get HOT in a pan. 
So it will be ready when you are.

Once your fries are dried, gently place them in the oil. 
 Tip: Throwing potatoes in hot oil splashes the oil, and it burns if it gets on you. 
Just so ya know. 


Let them cook for a few minutes.  Then remove to some paper towels. 
Add more potatoes to the oil and continue cooking, and then removing them to the paper towels. 


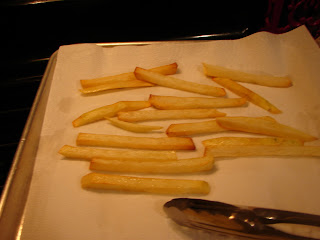
Your fries should look like this:
Soggy, pale, not super appetizing... Yet. 


Here's the secret.  You want to fry these babies again.  Once you have taken all the fries out of the oil, let it heat up again for a minute.  Then put the fries back in.  They will turn a golden brown pretty quick, and get nice and crispy. 
See how the fry holds its shape now?


Remove the fries from the oil again and place on new paper towels. 
Dust them with some seasoned salt. 
Try at least one right away.  (Well, after it cools slightly)

Look at the difference between the first frying and the second:


We ate these with some hamburgers the other night, and everything was so good. 

My husband kept stealing them from the kitchen before dinner was ready.
He admitted that he couldn't resist them, they were SO good. 

Try these out, you will like 'em!


No real recipe here.  You cut as many potatoes as you think your family will eat. 
For my family of 6, I cut 3 LARGE potatoes, and we had left overs. 

-Heat oil
-Cut potatoes
-Rinse potatoes
-Dry potatoes
-Fry potatoes
-Fry them again
-Sprinkle with seasoned salt
-Eat

Super easy.  :)

Thursday, November 10, 2011

Pumpkin Bread

So, I love pumpkin, but is has taken me a while to feel that way.  I used to really not like, at all, pumpkin pie.  (GASP!)  I know, crazy, right?  Well, I finally came around. 

There are so many pumpkin foods out there.  I gonna try and bring you a bunch of my favorites before Thanksgiving, and maybe after, because hey, pumpkin shouldn't only be enjoyed before Thanksgiving. 


Pumpkin Bread

My family LOVES this recipe, especially my kids. 
These loaves go quick at our house.


Ingredients
5 eggs
1 1/4 cups oil
1 (15 oz) can pumpkin (not pie filling)
2 cups flour
2 cups sugar
2 packages 'cook and serve' vanllia pudding mix (3 oz size)
1 tsp baking soda
1 1/2 tsp cinnamon
1/2 tsp salt

Beat eggs in large mixing bowl.  Add oil and pumpkin and beat til fully combined. 
In medium sized bowl stir together all remaining ingredients (all the dry stuff). 
Gradually add the dry ingredients mixture to the pumpkin mixture.  Beating after each addition to fully incorporate. 

Pour batter into loaf pans, 2 normal sized pans, OR 5 mini loaf pans. 
Bake at 325 degrees.
If using 2 normal sized pans, bake for 75-80 minutes. 
For mini pans bake for 50-55 minutes.
Use a toothpick inserted in the center to check if they are done. 
The toothpick should come out clean when they are fully cooked.   

Monday, October 31, 2011

Aebleskiver


My family grew up eating aebleskivers.  I love them, always have.  Here is a recipe from allrecipes.com, with some slight modifications.  These turned out so light and fluffy, and so delicious.

You start by separating two eggs and beating the whites til they form stiff peaks. 
Add all the dry ingredients, except for baking soda, and stir.  Then add some butter, egg yolks, buttermilk and soda -mixed, and beat til smooth.  Last, fold in the egg whites. 

 Now, to cook aebleskivers, you need an aebliskiver pan.  Click here to find one. 
Heat your pan over medium heat until it is hot.  When hot, add a little bit of butter to each to 'hole' in the pan. (About 1/4 to 1/2 tsp- I don't actually measure)

Next fill each hole with the batter.  You want to fill it just below or even with the top of the 'hole.'  It will grow as it cooks. 

 After about a minute, plus or minus some seconds, you will turn the aebleskiver.  I use a metal skewer, a tooth pick would work.  Just poke it down the side of an aebleskiver, trying not to get it in the raw batter, then hook it in and turn it.  It should now look like this.  The aebleskiver should be a nice golden brown.  (You may need to turn down the heat now, I find half way between medium and low works well.)

 Let cook a little more, then turn again, using the same process as before. 

Hook the skewer on the side...

 Lift to turn.  It should take about 3 or 4 turns to seal the aebleskiver and make it into a ball. 


 As the aebleskivers finish I put them in a pan to keep warm in the oven until they are all cooked.  This is where you let your baby smash them with a measuring spoon... just for fun. 

Or three measuring spoons...


You will find that some spots of the pan cook faster than others. So just start new aebleskivers as you go.  See here, some are done, some are one turn into the process, and some are just starting.  You want to cook these until the center is cooked through.  I stick my skewer into the center to see if it comes out clean, to test for doneness.  

Obviously the best part about these is eating them.  There are several ways to eat them. 
You can drizzle syrup on them.
You can open them up and spoon jam or jelly into the inside. 
Dip them in buttermilk syrup, yum. 
Or, the way my family always ate them, dip them in butter then sugar. 
We put a slice of butter on our plate, add some sugar next to that.  The hot aebleskiver melts the butter and the sugar sticks to that and it is so good. 


Yummmy.  Go get yourself an aebleskiver pan, if you don't have one already, and get to cooking some aebleskivers.  You won't regret it.  ;)


Aebleskiver Recipe


Ingredients:
2 eggs, whites separated
2 cups all-purpose flour
2 tsp paking powder
1 Tbs sugar
1/2 tsp baking soda
1/2 tsp salt
4 Tbs butter, melted
2 cups buttermilk
extra butter, for greasing pan

Directions:

In a medium bowl, whip the egg whites til they form stiff peaks.

In a separate, larger, bowl combine all the dry ingredients, except for the baking soda. 

In a medium bowl, measure the 2 cups of buttermilk and add the baking soda to that, before adding it to the dry ingredients. 

Add buttermilk/ baking soda combo, melted butter, and egg yolks to dry mixture.  Beat until smooth. 
Gently fold in egg whites. 

Cut about 1/4- 1/2 tsp of butter into each hole of hot aebleskiver pan.  Pour batter on top of butter.  Let cook until bottom is golden brown then use a skewer or tooth pick to turn, allowing all sides to cook.  Continue cooking and turning until the aebleskiver has formed a ball that is cooked all the way through.  

Sunday, October 23, 2011

Brownie Pudding

One of my all time favorite desserts is brownie pudding.  One of my college roomies taught me this one, and I'm so glad she did! 

It's super easy.  Mix your flour, sugar, cocoa, baking powder, and salt in a mixing bowl.  Add milk, oil, and vanilla.  Mix that thoroughly.  Scrape into a greased 8x8 pan.  It will look like this.


In a small mixing bowl (or pyrex measuring cup) combine some brown sugar and more cocoa.  Sprinkle that over top of the' brownie' batter, like so...


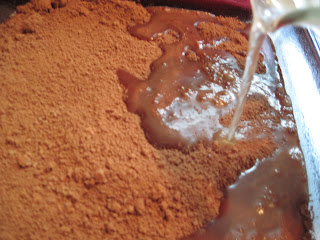
Then pour some hot water over the top of that...


The water will cover everything, and mix in with the brown sugar and cocoa combo. 


Then stick it in the oven for 35-45 minutes.  Until the 'floating' brownie on top is set.  If you jiggle the pan the brownie won't move around in the middle.  Then it's done. 

Scoop some vanilla ice cream into a bowl. 
(We used homemade ice cream tonight, and it was devine.)

Then spoon some brownie over top of the ice cream.  You will find a secret hot fudge under all that brownie goodness, make sure you get some extra of that on your ice cream.  Yummy! 


Not that it will be difficult, but you want to eat this before the ice cream melts from the yummy hot pudding/ sauce.  Mmmmm. 
(I just made a yummy sound.) 


Brownie Pudding

1 cup flour
3/4 cup sugar
2 Tbs cocoa (baking cocoa, the powdery kind)
2 tsp baking powder
1/2 tsp salt
Mix these ingredients together.  Then add:
1/2 cup milk
2 Tbs oil
1 tsp vanilla
Stir until well combined.  Pour into a greased 8x8 pan. 

In a separate bowl stir together:
3/4 cup brown sugar
1/4 cup cocoa
Sprinkle over top of brownie batter. 
Pour 1 3/4 cups hot water over top of brown sugar and cocoa mixture.  Pour slowly so your water doesn't dive into the brownie batter.  You want the water on top.  The batter and water will magically switch places during baking! 
Bake at 350 degrees for 35-45 minutes.  Serve hot, over vanilla ice cream. 


Friday, October 21, 2011

Corn Bread

Corn bread...mmmm.  This recipe is so good.  I got it from my MIL, she got it from her friend.  It's gotten around.  ;)
Slather this with some butter and drizzle on some honey and you'll be in heaven. 


Corn bread

1/2 cup butter (1 cube) melted
2/3 cup cugar
2 eggs
1 cup buttermilk
1 cup cornmeal
1 flour
1/2 tsp salt
1/2 tsp baking soda

Mix sugar and melted butter in a medium mixing bowl.  Add eggs and beat well.  In a separate bowl mix the buttermilk and baking soda.  Then add to egg mixture.  Add cornmeal, flour, and salt.  Pour into greased 8x8 baking dish.  Bake at 350 degrees for 30 minutes or until a tooth pick inserted in the middle comes out clean. 

Chili

It is finally starting to turn cold here.  The perfect meal to warm us up was chili.  Even my kids love this dish!


Chili

1 pound ground beef
1/2 bell pepper
1 small onion (or 1/2 medium)
1 tsp seasoning salt
2- 2 1/2 tsp chili powder
1/2 tsp cumin
1/8 tsp pepper
1/2 tsp dried oregano
1/8 tsp or less cayenne pepper
1/8 tsp or less crushed red pepper (optional)
1/2 cup frozen corn
2-3 15 oz cans of beans- black, pinto, kidney- your choice (undrained)
1-2 15 oz cans of diced tomatoes (undrained)


Brown your beef over medium heat in a good sized pot or large pan.  When almost browned add diced onion and bell pepper.  Cook the meat and veggies for a few minutes, stirring occasionally.  Add all the seasonings, cans of beans, and cans of tomatoes.  (And corn if using.)  I love black beans, so I always use a can of those, but I like a combination of all three kinds.  (For this picture I only used black beans, it was all I had.  Still tasted great!)

Once all ingredients are combined in the pot, bring to a boil then reduce heat to simmer.  Let simmer until you are ready to eat it.  Serve chili with your favorite toppings.  Mine are cheese, sour cream, and green onions.  Oh, and of course corn bread.  Yum!