Pages

Monday, October 31, 2011

Aebleskiver


My family grew up eating aebleskivers.  I love them, always have.  Here is a recipe from allrecipes.com, with some slight modifications.  These turned out so light and fluffy, and so delicious.

You start by separating two eggs and beating the whites til they form stiff peaks. 
Add all the dry ingredients, except for baking soda, and stir.  Then add some butter, egg yolks, buttermilk and soda -mixed, and beat til smooth.  Last, fold in the egg whites. 

 Now, to cook aebleskivers, you need an aebliskiver pan.  Click here to find one. 
Heat your pan over medium heat until it is hot.  When hot, add a little bit of butter to each to 'hole' in the pan. (About 1/4 to 1/2 tsp- I don't actually measure)

Next fill each hole with the batter.  You want to fill it just below or even with the top of the 'hole.'  It will grow as it cooks. 

 After about a minute, plus or minus some seconds, you will turn the aebleskiver.  I use a metal skewer, a tooth pick would work.  Just poke it down the side of an aebleskiver, trying not to get it in the raw batter, then hook it in and turn it.  It should now look like this.  The aebleskiver should be a nice golden brown.  (You may need to turn down the heat now, I find half way between medium and low works well.)

 Let cook a little more, then turn again, using the same process as before. 

Hook the skewer on the side...

 Lift to turn.  It should take about 3 or 4 turns to seal the aebleskiver and make it into a ball. 


 As the aebleskivers finish I put them in a pan to keep warm in the oven until they are all cooked.  This is where you let your baby smash them with a measuring spoon... just for fun. 

Or three measuring spoons...


You will find that some spots of the pan cook faster than others. So just start new aebleskivers as you go.  See here, some are done, some are one turn into the process, and some are just starting.  You want to cook these until the center is cooked through.  I stick my skewer into the center to see if it comes out clean, to test for doneness.  

Obviously the best part about these is eating them.  There are several ways to eat them. 
You can drizzle syrup on them.
You can open them up and spoon jam or jelly into the inside. 
Dip them in buttermilk syrup, yum. 
Or, the way my family always ate them, dip them in butter then sugar. 
We put a slice of butter on our plate, add some sugar next to that.  The hot aebleskiver melts the butter and the sugar sticks to that and it is so good. 


Yummmy.  Go get yourself an aebleskiver pan, if you don't have one already, and get to cooking some aebleskivers.  You won't regret it.  ;)


Aebleskiver Recipe


Ingredients:
2 eggs, whites separated
2 cups all-purpose flour
2 tsp paking powder
1 Tbs sugar
1/2 tsp baking soda
1/2 tsp salt
4 Tbs butter, melted
2 cups buttermilk
extra butter, for greasing pan

Directions:

In a medium bowl, whip the egg whites til they form stiff peaks.

In a separate, larger, bowl combine all the dry ingredients, except for the baking soda. 

In a medium bowl, measure the 2 cups of buttermilk and add the baking soda to that, before adding it to the dry ingredients. 

Add buttermilk/ baking soda combo, melted butter, and egg yolks to dry mixture.  Beat until smooth. 
Gently fold in egg whites. 

Cut about 1/4- 1/2 tsp of butter into each hole of hot aebleskiver pan.  Pour batter on top of butter.  Let cook until bottom is golden brown then use a skewer or tooth pick to turn, allowing all sides to cook.  Continue cooking and turning until the aebleskiver has formed a ball that is cooked all the way through.  

Sunday, October 23, 2011

Brownie Pudding

One of my all time favorite desserts is brownie pudding.  One of my college roomies taught me this one, and I'm so glad she did! 

It's super easy.  Mix your flour, sugar, cocoa, baking powder, and salt in a mixing bowl.  Add milk, oil, and vanilla.  Mix that thoroughly.  Scrape into a greased 8x8 pan.  It will look like this.


In a small mixing bowl (or pyrex measuring cup) combine some brown sugar and more cocoa.  Sprinkle that over top of the' brownie' batter, like so...


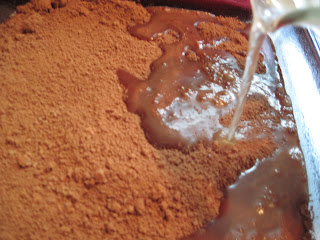
Then pour some hot water over the top of that...


The water will cover everything, and mix in with the brown sugar and cocoa combo. 


Then stick it in the oven for 35-45 minutes.  Until the 'floating' brownie on top is set.  If you jiggle the pan the brownie won't move around in the middle.  Then it's done. 

Scoop some vanilla ice cream into a bowl. 
(We used homemade ice cream tonight, and it was devine.)

Then spoon some brownie over top of the ice cream.  You will find a secret hot fudge under all that brownie goodness, make sure you get some extra of that on your ice cream.  Yummy! 


Not that it will be difficult, but you want to eat this before the ice cream melts from the yummy hot pudding/ sauce.  Mmmmm. 
(I just made a yummy sound.) 


Brownie Pudding

1 cup flour
3/4 cup sugar
2 Tbs cocoa (baking cocoa, the powdery kind)
2 tsp baking powder
1/2 tsp salt
Mix these ingredients together.  Then add:
1/2 cup milk
2 Tbs oil
1 tsp vanilla
Stir until well combined.  Pour into a greased 8x8 pan. 

In a separate bowl stir together:
3/4 cup brown sugar
1/4 cup cocoa
Sprinkle over top of brownie batter. 
Pour 1 3/4 cups hot water over top of brown sugar and cocoa mixture.  Pour slowly so your water doesn't dive into the brownie batter.  You want the water on top.  The batter and water will magically switch places during baking! 
Bake at 350 degrees for 35-45 minutes.  Serve hot, over vanilla ice cream. 


Friday, October 21, 2011

Corn Bread

Corn bread...mmmm.  This recipe is so good.  I got it from my MIL, she got it from her friend.  It's gotten around.  ;)
Slather this with some butter and drizzle on some honey and you'll be in heaven. 


Corn bread

1/2 cup butter (1 cube) melted
2/3 cup cugar
2 eggs
1 cup buttermilk
1 cup cornmeal
1 flour
1/2 tsp salt
1/2 tsp baking soda

Mix sugar and melted butter in a medium mixing bowl.  Add eggs and beat well.  In a separate bowl mix the buttermilk and baking soda.  Then add to egg mixture.  Add cornmeal, flour, and salt.  Pour into greased 8x8 baking dish.  Bake at 350 degrees for 30 minutes or until a tooth pick inserted in the middle comes out clean. 

Chili

It is finally starting to turn cold here.  The perfect meal to warm us up was chili.  Even my kids love this dish!


Chili

1 pound ground beef
1/2 bell pepper
1 small onion (or 1/2 medium)
1 tsp seasoning salt
2- 2 1/2 tsp chili powder
1/2 tsp cumin
1/8 tsp pepper
1/2 tsp dried oregano
1/8 tsp or less cayenne pepper
1/8 tsp or less crushed red pepper (optional)
1/2 cup frozen corn
2-3 15 oz cans of beans- black, pinto, kidney- your choice (undrained)
1-2 15 oz cans of diced tomatoes (undrained)


Brown your beef over medium heat in a good sized pot or large pan.  When almost browned add diced onion and bell pepper.  Cook the meat and veggies for a few minutes, stirring occasionally.  Add all the seasonings, cans of beans, and cans of tomatoes.  (And corn if using.)  I love black beans, so I always use a can of those, but I like a combination of all three kinds.  (For this picture I only used black beans, it was all I had.  Still tasted great!)

Once all ingredients are combined in the pot, bring to a boil then reduce heat to simmer.  Let simmer until you are ready to eat it.  Serve chili with your favorite toppings.  Mine are cheese, sour cream, and green onions.  Oh, and of course corn bread.  Yum!

Tuesday, October 18, 2011

Candy Sushi


Candy Sushi:
Green fruit roll ups
rice crisipies
marshmallows
butter
assorted cadies: swedish fish, gummy sharks, orange slices, pull'n'peel licorice etc.
colored surgar sprinkles

1) Make rice crispies treats: melt 1/2 cube butter and 40 large marshmallows in a large bowl in microwave. stir in 8 cups rice cripsies, until thoroughly coated. (leave in bowl, to be used shortly)

2) Cut some fruit roll ups into strips. Have candies ready to use, cut orange slices in half, open bags. Get a small bowl of water to dip fingers in.

3) Dip fingers in water, then shape a small amount of crispies treats into desired sushi shape. Top with candy of choice and wrap in fruit roll up. Place on tray or cookie sheet. For rolls, open whole fruit roll up, add a row of crispies treats to center, add desired candy, and roll up fruit roll up (like a burrito). Use a sharp knife and cut into pieces. (May want to chill before slicing). If making pieces to top with 'roe' make a small ball of crispies treats, and wrap with the end of a fruit roll up, leaving the rounded edge sticking up, cover the top with sugar sprinkles.

Pepperoncini Cream Cheese Dip


Pepperoncini Cream Cheese Dip:

8 oz cream cheese
1/2 c sour cream
1/4 c grated parmesan cheese
1/2 jar pepperoncinis finely chopped

1- soften cream cheese. Mix with parmesan cheese, sour cream, and chopped pepperoncini peppers. Chill and serve with pita chips or crackers of choice.

*For another great idea, spread on salami and serve with crackers. YUM!!

Brie Baguette Bites


Brie Baguette Bites:

1 baguette
butter
apricot or strawberry jam (or any you like)
thinly sliced brie cheese

1- Slice baguette into thin slices and arrange on a cookie sheet. Butter the tops of the slices, and toast under broiler 1-2 min. (Don't let these toast too much, they will go back in shortly). Remove from oven.

2- Flip toast slices over and on the untoasted side, spread with jam of your choice. Top with a thin slice of brie cheese.

3- Return to under the broiler for another 1-2 minutes, until cheese is melted and bubbly and edges are toasted. YUM!!


Stuffed Mushrooms!!!

Stuffed Mushrooms:


These are super yummy! I just made them for the first time last night and they are wonderful! A little spicy and vegetarian friendly- but don't worry carnivores, you won't miss the meat! Or, you can always add bacon!

What you will need:
20-25 whtie mushrooms
1 T minced garlic
1 T butter
1/4 t cayenne pepper
1/4 t onion powder
salt & freshly ground pepper to taste
8 oz cream cheese
1/4 c grated parmesan cheese
(cooked and crumbled bacon- optional)

1- Preheat oven to 375. Wash mushrooms and remove stems from caps. Set stems aside, and place caps (hole side up) in a baking dish.

2- Finely chop stems. Sautee chopped stems and garlic in butter. Add cayanne, onion powder, salt and pepper. Cook until stems are soft and most of the moisture is gone. Remove from heat and set aside and allow to cool for a few minutes.

3- Soften cream cheese. Add parmesan cheese and mushrooms-garlic blend. (If adding bacon, mix in now). Thuroughly mix together. Place a heaping spoonful of cheese-mushroom blend in mushroom caps.

4- Bake at 375 for 20 min. Liquid will start to gather in the bottom of the baking dish. (I let mine sit under the broiler for 1-2 minutes after the baking time, just to slightly brown the tops). Enjoy!!

Thursday, October 13, 2011

Corn Tortillas

I am a big fan of flour tortillas.  In fact that is what I will choose MOST of the time.  However, when it comes to 'taco truck' type tacos, I gotta go with a corn tortilla. 

Now, if you take a corn tortilla out of the package and throw some taco 'things' in it, the tortilla will fall apart.  It needs some preparation first.  You could fry it, which is sometimes good, but they can get kind of hard and chewy, and it's fried...  I prefer mine soft.  You could microwave it, but, really that is just not acceptable.  Lucky for me, my mom knows the best way to prepare a corn tortilla.  (Well, it is MY favorite way...) 

Heat a griddle, I use my big pancake griddle and heat it to about 300 or 350 degrees. 

Butter ONE side of each tortilla. Put the tortillas buttered side down on the griddle. 


 Now let them sit for about 30 seconds, until they start to form these bubbles on them.  Then turn them over. 


Now that the buttered side is up, sprinkle a little parmesan cheese on top.  (The powdery kind, not fresh grated)  Let 'em sit for about 20-30 more seconds and then use a spatula to fold them in half and remove to a plate.  


Immediately stuff those babies with some meat.  Carne asada, taco meat, carnitas (pictured here), whatever you like in your taco.  Keep them warm until ready to eat.  If your meat is juicy you want to eat these right away, no one likes a soggy taco shell.  


Add your favorite taco toppings and enjoy!!

Chili Relleno Meatballs

My husband is not a picky eater. He'll eat just about anything I put in front of him. However, of course, he does have his favorites.  This would be one of them.  Chili Relleno Meatballs.  Doesn't that just sound like something a man love? 

My family has been making these for as long as I can remember, and they are oh-so-good. 

Step by step instructions (recipe at bottom):
So, first off you mix your bread crumbs together with some milk -to let them soften.  It makes for a softer meatball. 
Add to that your hamburger, parsley, salt, pepper, eggs, and chopped green chilis. 
Mix that together really well.  You don't want clumps of bread crumbs so makes sure you have mixed things well.
Then cube your cheese.  Jack cheese is best, unless you like a little spice -then go for pepper jack.  :) 

Take a small portion of the meat mixture and flaten in on the palm of your hand.  Place one cube of cheese in the middle and fold the meat around the cheese -sealing it as you go.  (The cheese will melt as you cook these, so you don't want holes if you can help it.) 


 Line up the meatballs in a baking dishand cook in 450 degree oven for about 15 minutes.  They may not be fully cooked at this point, so resist the temptation to eat one now. 

Cover your meatballs with the sauce and put back in the over, set at 350 degrees, for 20-30 minutes, or until they are done.  The sauce should be bubbly. 

My favorite way to eat these is with this rice pictured here.  (Recipe to come soon!)  I love the sauce with the melted cheese and how it sinks into the rice.  Mmmmm.  Buttered pasta would also be great!


Poor lighting and poor camera make for poor pictures... You'll just have to make them for yourself to see how good they really are!!  ;)


Chili Relleno Meatballs

1 cup dry bread crumbs
1/4 tsp pepper
3/4 cup milk
3 pounds hamburger
3 Tbs chopped parsley 
2 cans chopped green chilis
3 eggs
1 1/2 tsp salt  
Approx. 16 oz of Jack Cheese (or pepper jack)


Mix crumbs and milk -let stand for a few minutes.  (2-3 is good)
Add beef, parsley, eggs, salt, pepper, and 2 cans of chilis. 
Cube cheese into approximately 1/2 inch cubes. 
Flatten a small handful of beef mixture onto your palm and top with one cheese cube.  Wrap beef around cheese.  Place in greased baking dish.  Continue until all the meat is used. 
Bake in 450 degree oven for 15 minutes. 

Sauce:
1 large onion
3 cloves garlic
2 Tbs olive oil
2-3 cans diced tomatoes (15 oz size) Depends on how much sauce you want. 
1 cup broth (anykind) or milk
1 tsp sugar
1 tsp salt
1 1/2 tsp oregano
1 can green chilis

Saute onion and garlic over medium heat til onions start to soften, about 3 minutes.  Add all remaining ingredients and simmer for 20-30 minutes.  Then pour over meatballs. 
Put baking dish with meatballs and sauce back in oven at 350 degrees for 20- 30 minutes, til sauce is bubbly. 

This makes about 24 meatballs.  This dish freezes VERY well.  Just got upto putting the sauce on the meatballs and then freeze them.  When ready to eat just pop them back in the over until heated all the way through, and sauce is bubbling.  I usually make 1/2 with jack cheese for my kids and 1/2 with pepper jack cheese for us parents. Enjoy!  Let me know how they turn out!